
Live video is everywhere.
One in five videos on Facebook is a live broadcast.
These days, you can livestream anything from your dog's birthday party to your yoga practice or even your new haircut.
But live videos aren’t only for personal use— whether you’re showcasing a new product, hosting an interview or Q&A with fans, or sitting down and having a casual conversation with your followers, livestreams are an engaging way to grow your business.
Every day, people tune in to watch live videos from their favorite creators and join conversations about the topics that matter to them. With Live's real-time interactivity features like comments and reactions, these broadcasts create spaces where people can connect and engage with their favorite brands in an authentic way.
When people watch live broadcasts, they're six times more likely to interact with them than regular videos. Whether it's a Facebook Page or Profile, going Live is an easy way to engage your audience.
This guide will teach you everything you need to know about Facebook Live and how to get started.
Going Live on Facebook—Step By Step
Facebook makes it easy to go live from your page, group, or event. Follow this simple process when you’re ready to start.
Note: You can go live from your phone or computer. The steps for each look a bit different, so we’ll go over both options below. We’ll start with the phone guide, so feel free to skip ahead if you plan on only streaming from a computer.
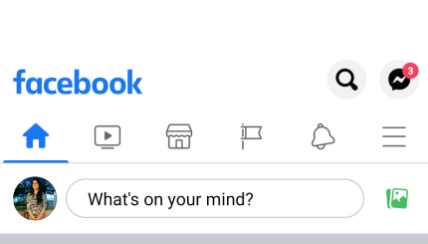
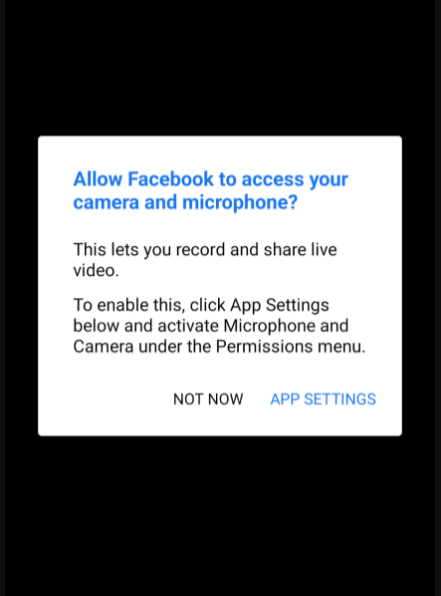
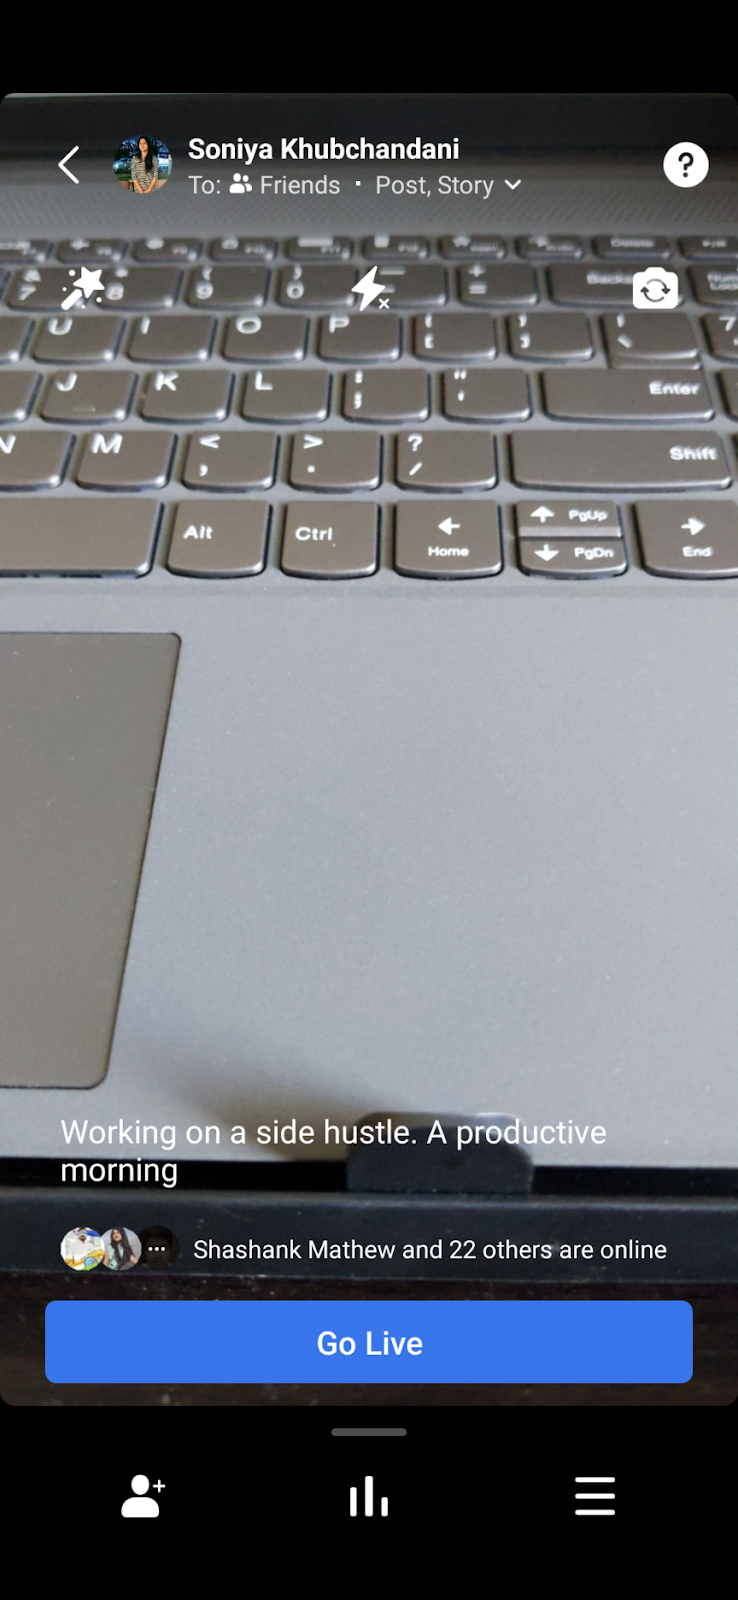
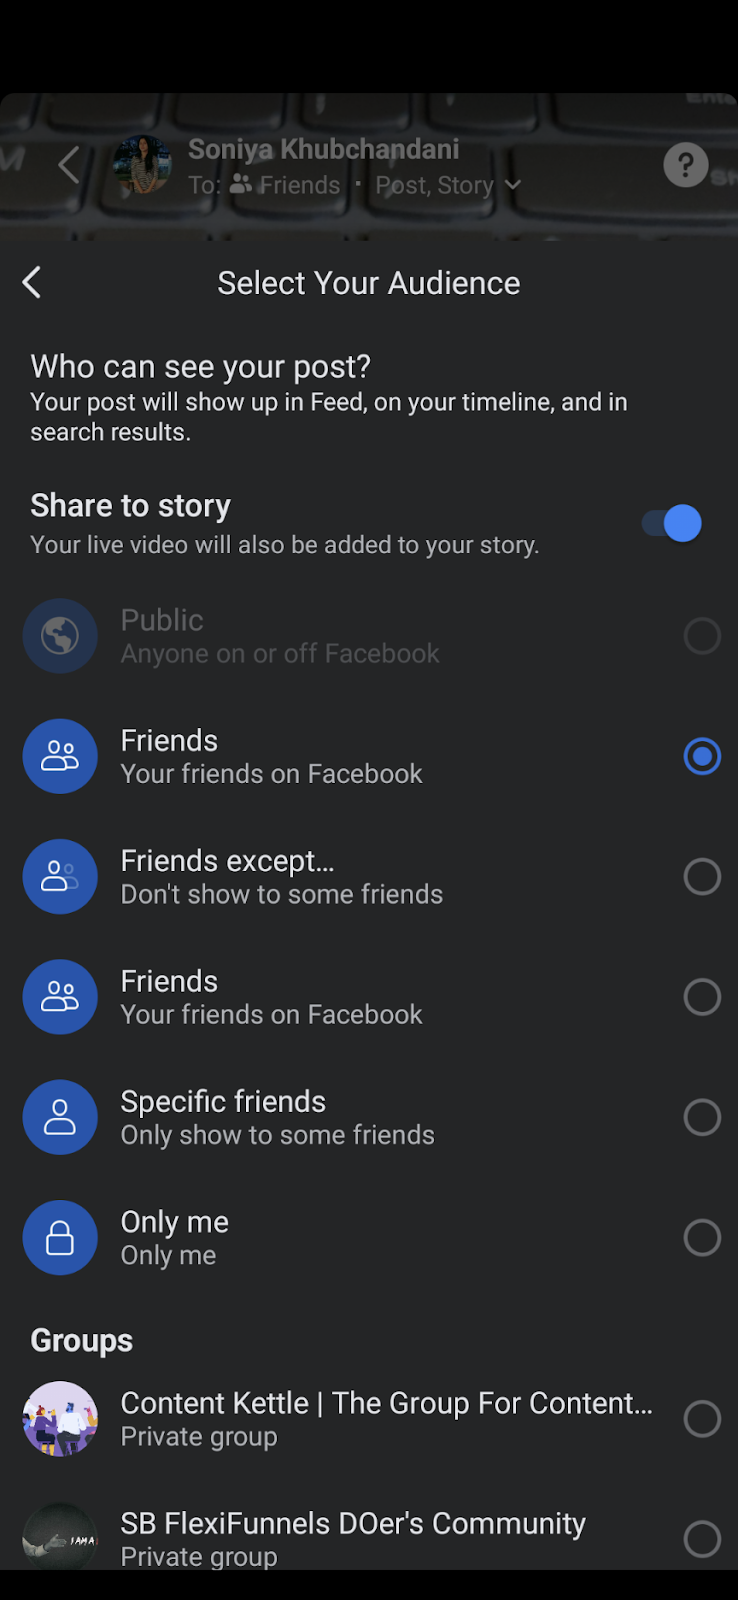
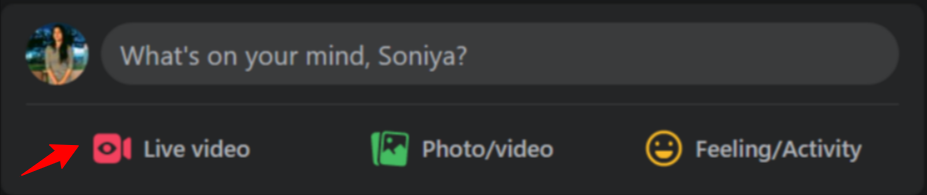
How to go live on Facebook from your phone:
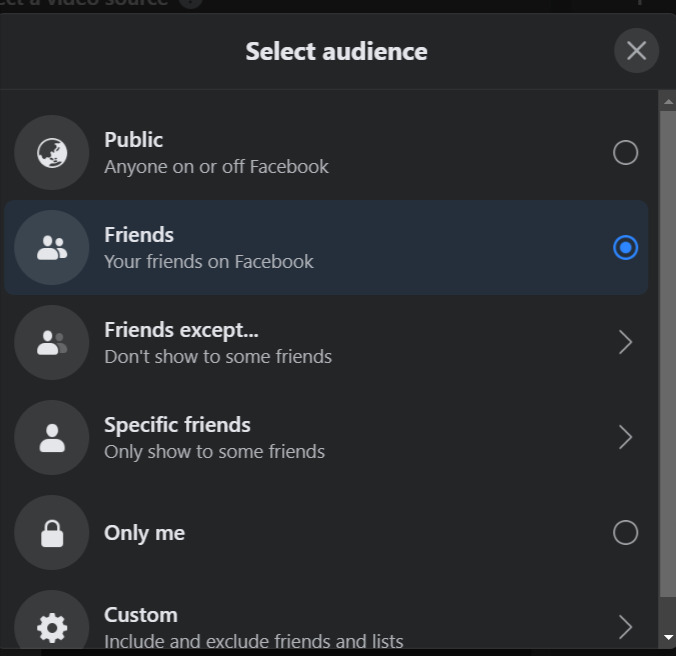
How to go live on Facebook from your computer:
How to go live on Facebook from Messenger Rooms
Source: Facebook
If you're the creator of a Messenger room, you can go live from your room using Google Chrome! Here's how:
Where are Facebook Live settings?
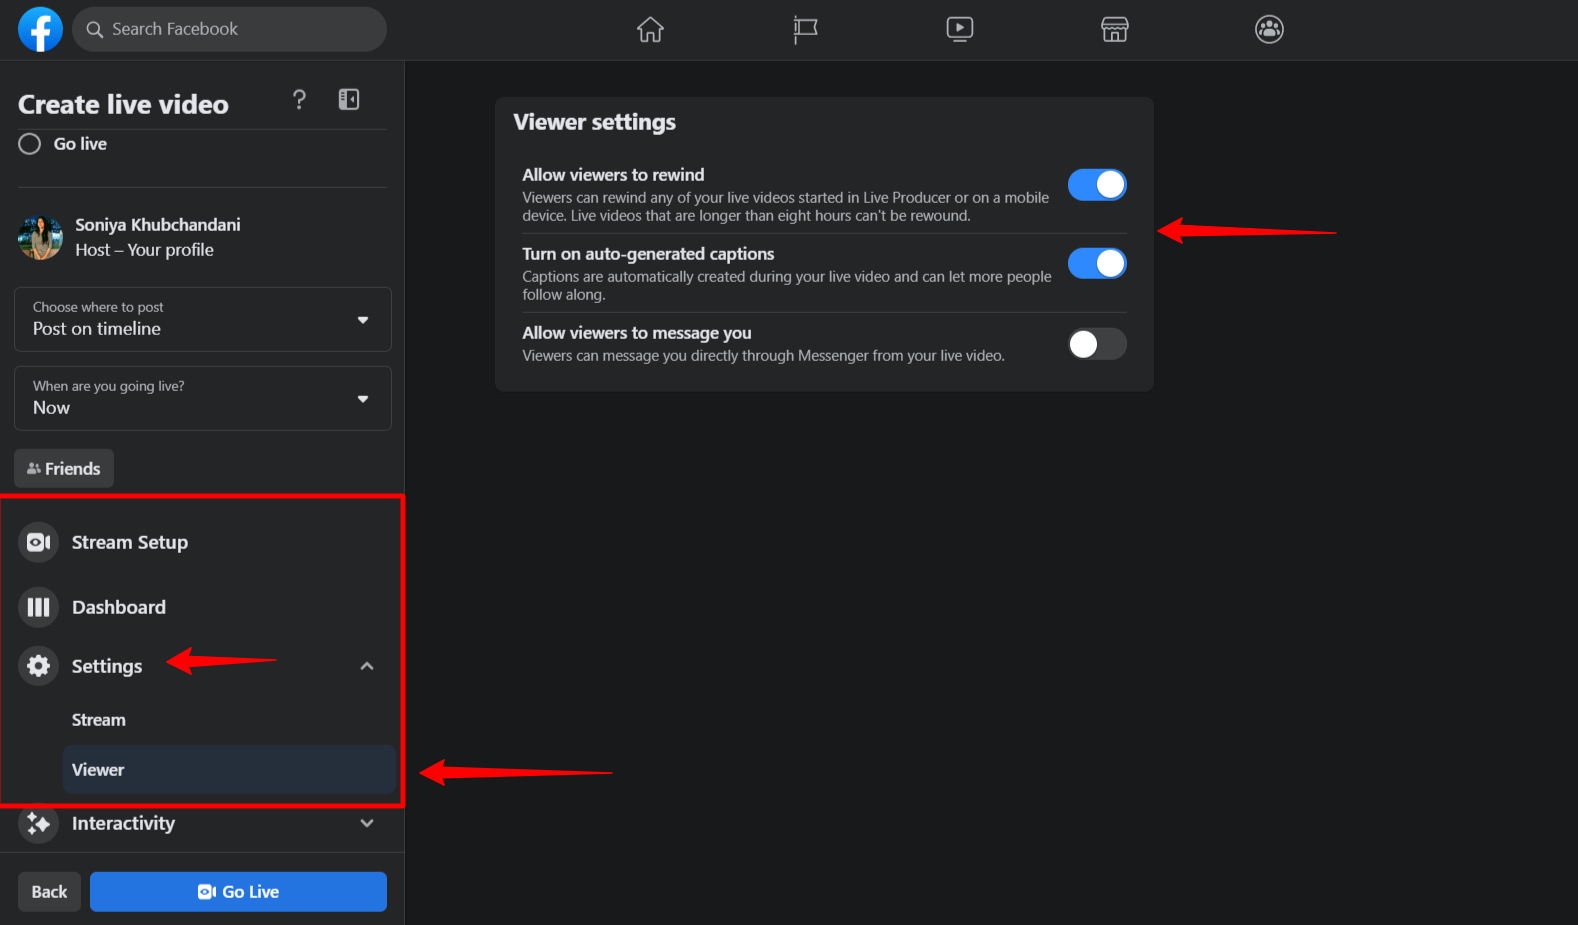
The Live Producer dashboard within Facebook is where you can manage the additional settings for your live broadcasts. Here are some of the options available:
Are Facebook Livestreams recorded?
When you livestream on Facebook, you might want to save or share that video. Maybe you want to watch it later, or you want to make sure no one else can access it.
Whatever your reason, your Facebook livestreams are automatically recorded for you, and there are a few different ways to work with the recordings.
If you don't want the recording to remain on Facebook, go to your Timeline and delete it from Your Posts. However, if you want a copy of the video, there's an easy way to download it.
Just head over to the post on your Timeline, click the three dots in the top right corner, and hit "Save Video." Your video is now saved in your downloads! You can now share it on whatever platforms you'd like!
Are Facebook Live comments public?
Have you been wondering if Facebook Live comments are public? The answer is it depends.
By default, comments on your Facebook Live will be visible to anyone who has access to your Livestream. However, you can change these settings at any time during your broadcast.
If you have created a private group or event, only members of that event or group will be able to see the comments in your stream. This applies to both watch parties and standard streams.
As a streamer, you can remove comments from your stream even after the broadcast is over. You cannot edit the comment, but it will be hidden from view for all viewers. You can also report and disable comments completely if necessary.
Can Facebook Live videos be downloaded?
As long as you’re the person who uploaded the livestream, it's a fairly simple process to download the recording. Go to your Page, click on the video to make it fullscreen, click the three dots in the upper-right corner of the video, and select "Download Video."
And that's it. Now you have your Facebook Live Video handy for whenever you need it.
But keep in mind that you can only do this with your own videos—if someone else goes Live and posts it to your page, for instance, you won't be able to download that video.
Best practices for Facebook Live
Facebook Live might be your brand's best bet for getting your message to potential customers. It's a feature that allows you to broadcast whatever you want in real-time, directly to your followers. It's a great way to create a sense of urgency and connect with people at the moment—and it can even be a way to encourage sales if you use it right.
But before you dive right into creating your own livestreams, there are some things you'll need to consider.
Make sure you have a good internet connection. You don't want to lose the feed right in the middle of your livestream! A wired connection is best, but if that's not possible, make sure the WiFi signal is strong.
Keep an eye on your device’s battery. This should be obvious, but ensuring that your phone or computer has enough juice to get you through your stream is essential. You don’t want anything to cause your livestream to drop mid-sentence.
Use a quality microphone. This one is important because your viewers won't stick around if they can't hear you. If you're recording on your phone or laptop, try using earbuds. These are less visually distracting than wearing headphones. For the best sound quality, consider using an external professional microphone.
Do a trial run to make sure everything is working. The last thing you need is for something technical to go wrong when you're already nervous about going live in front of an audience! Before you hit that "Go Live" button, take a few minutes to record yourself presenting to whoever's on camera with you. Then, play it back and check the sound/lighting/visuals.
Look into the camera, not at yourself. Watching yourself on the screen can be tempting when you're livestreaming, but it's important to look into the camera so your attention is on your viewers.
Set the scene. If you're in a new location, make sure to have your broadcast settings set to 'On.' If you livestream from a new location, it will appear in your posts as that new location.
Setups and cameras for Facebook Live
No matter what type of content you're creating, the quality of your camera setup will have a significant impact on how your audience receives it.
If you want to go live on Facebook, there are many ways to get started, and which one is best for you depends on what kind of content you're creating and who your audience is.
It's worth noting that Facebook Live is compatible with various cameras and equipment. That said, we've whipped up some examples using a few standard pieces of hardware so you can get a better sense of what your setup could look like.
One really popular option is using a smartphone. You can use the camera app on the phone or download a streaming app. If you don't want to stream from your phone, you can also use a webcam or a DSLR to upgrade your content.
Video conferencing cameras are great for large-scale events and public speaking engagements. If you're looking for something simple that takes all the guesswork out of the setup, check out Facebook Portal—all you have to do is plug it in and start your stream!
Video switchers are a great choice if you are streaming with multiple cameras or people moving around.
Although external microphones can enhance the sound quality of your video, they are not crucial if you don't own them. A tripod can also help stabilize your video, but it is not necessary.
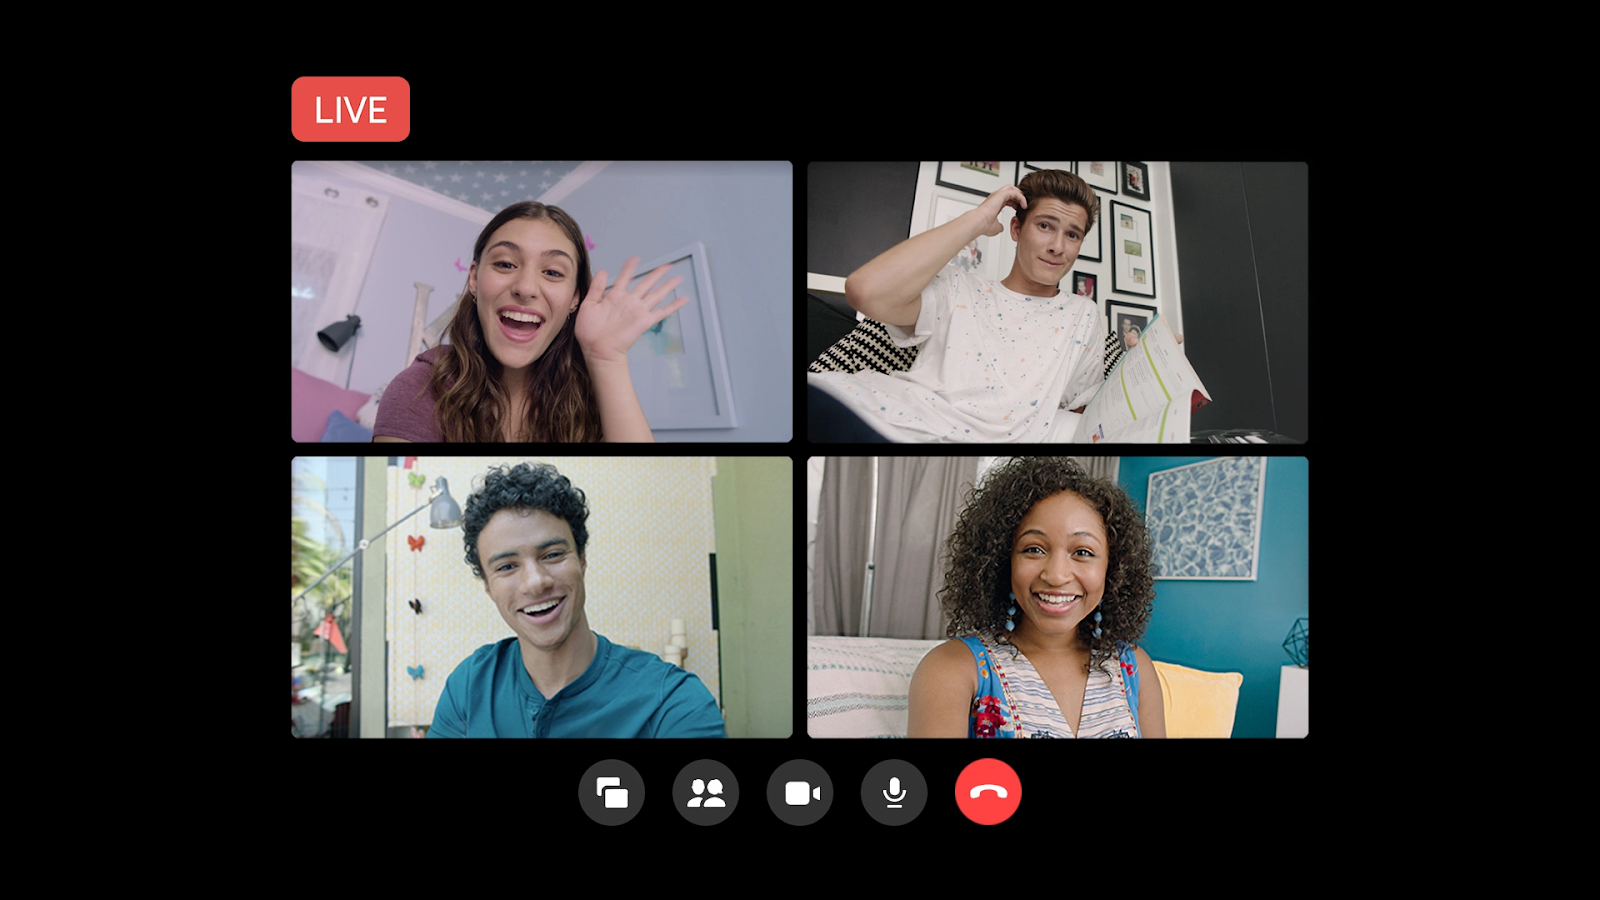
Facebook Live with a guest
Every live video you broadcast on Facebook is a chance to connect with your audience in a new way. Adding guests to your streams is an easy way to expand your reach and create more engaging content for your viewers.
You can have up to three guests on your livestream. They will be displayed in a split-screen, side-by-side layout. You can invite guests at any time during the live broadcast.
There are a few different ways to invite guests into your Facebook live stream:
Use comments in the post. Audience members can request to join you as a guest by commenting "join" on the Facebook Live post. The host will receive a notification that someone has requested to join and can then invite them into the broadcast (or not!).
Ask viewers to comment. If you're looking for specific people to join you as a guest, ask your audience via comments which people would like to join next.
Private message. You can also privately message someone you'd like to invite into the broadcast
If you're looking for a more structured way of hosting guests on Facebook Live, you can schedule a recurring weekly show. It allows you to set up a calendar of upcoming shows with dates and topics for yourself and any guests joining you.
Facebook Live with multiple presenters
Setting up a Facebook Live with multiple presenters doesn't have to be complicated. All you need is one Facebook account and equipment that makes all presenters audible.
Here's how to set up a guest on Facebook Live, but be aware that this is only available on iOS and Android.
You'll also need two smartphones or tablets to pull this off. Ensure that the device you want to stream from has the Facebook app installed and updated.
Then, check out the Facebook Live setup page to learn how to set up your live stream and invite guests. Make sure you have all of the presenters' names and email addresses in hand so they can be added before the broadcast begins!
Finally, make sure your setting is ready. If you're using an iPhone or iPad: Click on "Settings" from the main page of Facebook, then select "Privacy." Scroll down until you see "Who Can See My Stuff?". Choose whatever option works best for your needs! You can always change it later if needed.
Adding captions to Facebook Live
To ensure that as many people see your message as possible, you may want to consider adding subtitles to your videos. Did you know that 85% of video content is viewed without audio? That's right—which means if you depend on audio-only content to get your message across, most of your viewers are missing what you have to say. So, make sure your message is coming through loud and clear even without audio by adding captions.
Publishers using the Live API can now add CEA-608 standard closed captions to Facebook Live broadcasts. If you want to do this yourself, check out the guide for instructions.
However, publishers who aren't using the Live API can work with third-party captioning companies to generate and insert real-time closed captions into their Facebook Live broadcasts.
How to use Facebook Live for business
Facebook Live is a powerful marketing tool, but it can be challenging to know how to make the most of it. Luckily, with just a few simple steps, you can use Facebook to its full potential—and even increase your bottom line.
Set up your profile
You can start by creating a Facebook Business Page if you do not already have one. It's a great way to stay connected with your customers, inform them of new products or services, and let them know what's happening at your company. You can also use it as an avenue for promoting events and announcing any special offers you might have coming up soon.
Create a content strategy
The next thing you need to do is make sure your content will be interesting to your audience. People will likely tune out if you don't have an engaging topic, so it's important to have a strategy before you go live. Some of the best content includes interviews with experts or influencers, behind-the-scenes tours of your office space, and live announcements about upcoming events or promotions.
Set up Facebook Live
Once you've got a topic in mind, it's time to set up your stream! You can get started by going to the Facebook Live Producer page and clicking on the "New Broadcast" button at the top right corner of the screen. From there, you can select your camera and microphone inputs and any other relevant settings for your broadcast (such as whether or not you want comments displayed). Then click "Go Live" when you're ready!
The key here is preparation—make sure everything is set up beforehand so there won't be any issues once it's time for your broadcast.
Facebook Live for a private event
Facebook Live lets your guests watch an event from the comfort of their homes. You can use Facebook Live to create a private event and invite only the people you want to attend.
Here are some ways that Facebook Live can be used to host a private event:
Friendly gatherings
Friends and family can enjoy a get-together without having to leave their homes. This option is excellent for those who live far away from each other but still want to celebrate together.
Business meetings
Hosting a business meeting on Facebook Live is great for employees who live in different regions or cities.
Online classes
The COVID-19 pandemic has led many schools and universities to switch to online learning. Regardless of your class type, you can use Facebook Live to give your students an accessible space to learn.
Whether you're looking for a new way to connect with your friends or planning a business meeting, Facebook Live for private events is the perfect solution!
Facebook Live for weddings
Weddings are a huge deal. You want everyone important to you to attend, but it isn't always possible. If you're hosting a destination wedding or just want friends and family that are across the country or across the globe to be able to watch your ceremony without having to fly out, Facebook Live is a great solution!
You should keep in mind a few things when using Facebook Live for weddings.
The first thing you need to do is prepare: make sure that the Facebook Live setup will be in a place where it won't get in anyone's way and that you have someone to film the ceremony. Make sure the person filming is comfortable with Facebook Live and knows how it works.
Next, make sure that all your equipment is set up and ready to go before you begin broadcasting. You can test it by going live on your account to make sure everything is working properly—you don't have to have an audience to do this!
How to engage with the audience
The heart of Facebook Live is engagement. We love that our audience can participate in the wedding and feel a part of it, even if they're on the other side of the planet!
But what's the best way to get them involved? Here are some tips:
Open with a question. A personal anecdote or a funny story about how you met your fiance—anything to get people interested!
At regular intervals, ask your audience questions. There's nothing that gets people more engaged than being asked their opinion! And don't be afraid to ask multiple times to give people time to respond.
Don't forget to end with a question. Make sure you have time to read through some of the comments before signing off. It's always nice for people to know they were heard.
How to End Your Facebook Live
When the ceremony is over, it's time to end the livestream.
To end a Facebook Live video, simply swipe down and tap "End." If you're on a computer, just click "End Live Video" in the bottom right-hand corner.
Once you've ended the livestream, it will automatically save as a video to your Timeline so you can share it with friends and family later.
Facebook Live for funerals
Funerals are a time for friends and family to come together, and many people want to be able to share those moments with loved ones who can't attend. Livestreaming is an increasingly popular way to make sure everyone is included.
Facebook Live for musicians
Facebook Live is a powerful tool that allows you to share your music with the world and build a community of fans. Here's how you can use it to promote yourself, your brand, and your music.
Get creative with your live streams. Do you want to preview a new single? Want to show off your skills on the piano or guitar? Use Facebook Live to play it for fans! You don't need fancy equipment: just stream from your phone.
Stream from concerts or festivals where you're playing. Your fans will love being able to see what it's like behind the scenes, so don't be afraid to let them in on the fun.
Showcase the work it took for you to get there—it's all part of building a solid brand!
Facebook Live is a great way to connect with current fans and cultivate future ones. Whether you're performing in your bedroom, at a local venue, or on a big stage, Facebook Live allows music lovers worldwide to experience your talent.
Facebook Live with music
Now that you've published your first Facebook Live video, you're probably looking for ways to improve it. One of the most common ways to do that is by using background music. It can elevate the experience from good to mind-blowing.
First, make sure you have the right permissions. You may have heard of or experienced issues regarding using music in Facebook Live due to copyright restrictions. To avoid any issues, make sure that whatever music you use is properly licensed.
There are two ways of adding music to your Facebook live stream. One is by using your phone, and the other is by plugging a device into your computer. Both methods involve playing music from another source while conducting the live stream. You can use an external speaker or headphones or an external microphone via USB on your computer.
Wrapping up
Reaching your audience with live video content is a great way to showcase your brand and increase engagement with your audience. Facebook Live is free, easy to use, and offers a variety of uses for businesses and individuals alike.
You can use the service to broadcast an event, host an interview or Q&A session, or even just chat with your viewers in real-time. It can reach a massive audience of Facebook users who will be excited to interact with you.
The best way to get started with Facebook Live is to dive in! You don't need any special equipment—just a social media account, an idea for what you want to share with your audience, and a willingness to get out there and show people how it's done. Start simple and build from there—before you know it, you'll be an engaging, creative master of Facebook Live.


0 Comments